Forced
Convection on a Flat Disk
 You
can get the information of the unit#4,
#5,
#6
and #7
Forced
Convection on a Flat Disk
 You
can get the information of the unit#4,
#5,
#6
and #7
|
|
|
|
|
|
|
|
Measurement of the average convective heat transfer coefficient for the forced convection of air past a flat disc thermistor heat transfer model, and the development of an appropriate empirical correlation for the Nusselt number.
The average convective heat transfer coefficient, ![]() ,
can be defined indirectly by Equation 1, in terms of the rate of convective
heat transfer between the solid and the fluid,
,
can be defined indirectly by Equation 1, in terms of the rate of convective
heat transfer between the solid and the fluid, ![]() ,
the surface area through which the energy is being transferred, A, and
the difference between the solid surface and the bulk fluid temperature,
(T
- Tf). Thus
,
the surface area through which the energy is being transferred, A, and
the difference between the solid surface and the bulk fluid temperature,
(T
- Tf). Thus
Solving for the convective heat transfer coefficient, h, yields
 (2)
(2)
Measurement of the actual convective heat transfer rate must be an indirect
measurement which represents the cause or effect of the heat transfer;
such as electrical joule heating, vaporization rate, condensation rate,
transient temperature changes, temperature gradients, etc. The main difficulty
with this measurement is that one of the above indirect measurement techniques
is used to represent the actual rate of heat transfer through the particular
surface area in question. Such an approximation may introduce significant
errors, especially if the geometry is small.
Utilization of Thermistor Heat Transfer Models
The convective heat transfer apparatus utilizes thermistors of different
geometry's as heat transfer models. Thus the instrumentation for measuring
both the surface temperature, T, and the heat transfer rate,![]() ,
is the heat transfer model itself. Since the thermistor is a temperature
sensitive resistor, the surface temperature, T, of the thermistor is the
temperature of the thermistor itself, and it can be measured indirectly
by measuring the resistance of the thermistor. The rate of heat transfer,
,
is the heat transfer model itself. Since the thermistor is a temperature
sensitive resistor, the surface temperature, T, of the thermistor is the
temperature of the thermistor itself, and it can be measured indirectly
by measuring the resistance of the thermistor. The rate of heat transfer, ![]() ,
from the thermistor is generated within the thermistor model itself by
joule heating. Thus,
,
from the thermistor is generated within the thermistor model itself by
joule heating. Thus, ![]() can
be measured indirectly by measuring the current flow through and the voltage
drop across the thermistor.
can
be measured indirectly by measuring the current flow through and the voltage
drop across the thermistor.
Thermistor Resistance-Temperature Characteristics
The resistance-temperature characteristics of the various thermistor heat transfer models can be measured by inserting the Heater Section into the apparatus as discussed later, and using a Test Section Module containing a particular heat transfer model. It is possible to measure the resistance-temperature characteristics of the thermistor by simply varying the temperature of the air flow by varying the power supplied to the Heater Section. By measuring the thermistor resistance with an ohmmeter, and the fluid temperature with a thermocouple, the thermistor resistance can be measured over a wide range of temperatures.
By utilizing the resistance-temperature characteristics of the thermistor,
the problem of measuring the heat transfer model surface temperatures,
T, is resolved. The thermistor temperature is determined from the measured
thermistor resistance and the resistance-temperature calibration curve.
Thermistor Measurement Circuitry
Referring to the
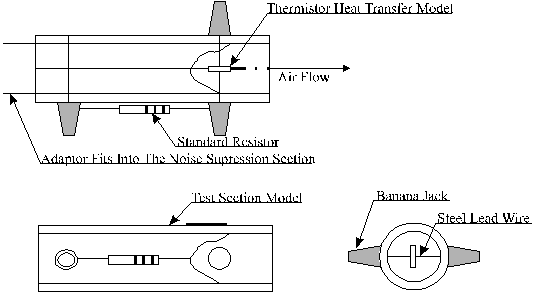
schematic of Test Section Module shown in Figure 1, a disc type thermistor
heat transfer model is utilized to demonstrate how the average convective
heat transfer coefficient, ![]() ,
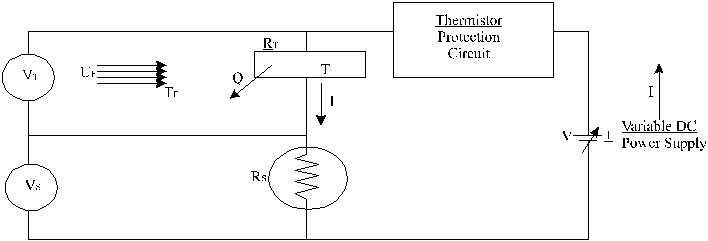
can be experimentally measured. The schematics of the Thermistor Measurement.
Circuitry utilized in measuring the average forced convective heat transfer
coefficient,
,
can be experimentally measured. The schematics of the Thermistor Measurement.
Circuitry utilized in measuring the average forced convective heat transfer
coefficient, ![]() , is shown
in Figure 2.
, is shown
in Figure 2.

Figure 1. Schematics of the test section module.
At a given fluid velocity, as measured by the pitot tube, electrical power is delivered to the thermistor from the D.C. power supply which in turn causes the thermistor temperature to increase due to joule heating. Now, if a fixed voltage is applied across the thermistor, and the convective heat transfer from the thermistor is less than the joule heating inside, the thermistor temperature will increase causing the resistance to decrease, thus causing a still higher level of joule heating, a runaway situation which causes the thermistor to burn out. However, by employing a standard resistance of a known value, and a particular circuit configuration (see Fig2 ), this problem can be overcome.

Figure 2. Schematic of the thermistor measurement circuitry
Experimental
Determination of ![]()
An empirical expression for measuring the heat transfer rate, ![]() ,
from the thermistor to the flowing fluid may be found in terms of the electrical
power, P, delivered to the thermistor. Therefore,
,
from the thermistor to the flowing fluid may be found in terms of the electrical
power, P, delivered to the thermistor. Therefore,
![]() =
P = i VT
(3)
=
P = i VT
(3)
![]() =
VT2 / RT
(5)
=
VT2 / RT
(5)
Referring to the Thermistor Measurement Circuit shown in Figure 6, the voltage across the thermistor and the standard resistor can be expressed as:
VT = i RT (6)
Vs = i Rs (7)
Dividing Equation 7 by Equation 6 yields,
VT/VS = RS/RT (8)
RT = RSVT / VS (9)
Therefore, by substituting Equations 8 and 9 into Equation 5, an expression for the heat transfer
rate, ![]() ,
is obtained. Thus:
,
is obtained. Thus:
![]() =
VTVS / RS
(10)
=
VTVS / RS
(10)
Substitution of
Equation 10 into Equation 2 yields an experimental expression for the indirect
measurement of the average forced convective heat transfer coefficient, ![]() ,
for a given fluid velocity.
,
for a given fluid velocity.
Therefore, since the geometry and the resistance-temperature characteristics
of the thermistor heat transfer model are known, along with the standard
resistance, the only direct measurements required to indirectly determine
the average convective heat transfer coefficient, ![]() ,
are the voltages, VS and VT.
,
are the voltages, VS and VT.
Dimensionless Correlations
For the case of fluid flow past a disc type thermistor, the Nusselt number, Nu, is a function of the Prandtl number, Pr, and the Reynolds number, Re. Experimental evidence suggests that for many situations involving forced convection heat transfer, the Nusselt number can be expressed in the following generalized form:


where C, m, and n are empirical parameters which must be determined from the experimental data by statistical methods. Note that the parameters k, m , r , Cp, and u ¦ represent the thermal conductivity, the viscosity, the density, the specific heat, and the free-stream velocity of the fluid, respectively.
A wide range of average forced convective heat transfer data is found to be of the form:
Nud = C Pr1/3 Redn (12)
where C, and n are values obtained from the experimental data by statistical means.
The following apparatus is used in this experiment.
1. A convective heat transfer measurement system, detailed below.
2. Test section modules.
3. Heating element.
4. Two digital multimeters.
5. Pitot-static tube and digital manometer.
6. Thermocouple and digital temperature indicator.
Convective Heat Transfer Measurement System
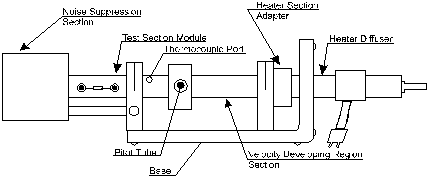
The Convective Heat Transfer Measurement System is an experimental apparatus for measuring forced and natural convection heat transfer for external flows over surfaces of various geometries. A sketch of the basic apparatus for forced convection measurement is shown in Figure 3, and a cut-away section is shown in Figure 4.

Figure 3. Basic
Apparatus for experiment 5

Figure 4. Cut-away section of the basic apparatus.
Starting at the far right of the sketch, a Diffuser Section allows air to enter into the apparatus from the air supply with the intent of shaping a uniform velocity profile further downstream in the long tubular section referred to as the Velocity Developing Region. A Heater Section may be inserted in between the Diffuser Section and the Velocity Developing Region Section so that a variable A.C. power supply connected to the Heater causes the temperature of the flowing air to be varied over a wide range.
By using the Heater Section in conjunction with a given Test Section Module, housing a particular thermistor heat transfer model, the resistance-temperature characteristics of the thermistor may be experimentally measured. In determining the resistance-temperature characteristics of the thermistor, the wall temperature is assumed to be equal to the temperature of the flowing air. The air exits the apparatus through a Noise Suppression Section. Near the end of the Velocity Developing Region Section, a pitot-static tube and a thermocouple probe are inserted to measure the air velocity and temperature, respectively. The pitot-static tube is connected to a digital manometer where the dynamic pressure can be measured. From the dynamic pressure measurement, the air velocity flowing past the heat transfer model may be indirectly measured.
Test Section Modules
Note the modular design of the individual thermistor heat transfer models. These modules can be interchanged easily. The Noise Suppression Section is connected to the apparatus by means of a long metal rod. By simply pulling the muffler away from the apparatus slightly, the Test Section Module can be removed and another inserted with ease. This compact feature makes provisions for various heat transfer surface geometries, and also for various fin configurations. A sketch of a typical test section is shown in Figure 1, where the particular heat transfer model is a disc type thermistor. Mounted on the side of each Test Section Module is a standard resistor which is "matched" to the particular thermistor heat transfer model inside. The Test Section Module fits into the apparatus as shown in the cutaway view of the apparatus in Figure 4.
Thermocouple and fluid temperature measurement
Referring to Figures 3 and 4, the temperature of the fluid is monitored by a thermocouple probe located downstream from the pitot tube. It protrudes approximately one-half inch into the fluid field. Locating the thermocouple downstream from the pitot tube prevents the thermocouple probe from distorting the fluid velocity profile which could be the case if it were located upstream from the pitot tube.
Pitot-static tube and velocity measurement
The combination of the diffuser section and velocity developing section of the apparatus is designed in such a way that the air flow entering the Test Section Module possesses a uniform velocity profile as it approaches the thermistor heat transfer module. The mean velocity of the air flowing through the Test Section Module is measured with a pitot tube set at the centerline of the Velocity Developing Section, it is found that the pitot tube is a reasonable means of measuring the mean air velocity over a wide range of air flow rates. It should be noted that when the fluid velocities are being monitored, the Heater Section should be removed. This is done to prevent the Heater from distorting the mean velocity profile of the flowing air.
1. Guidelines for Experiments
NOTE:
The heater module is used only for resistance - temperature calibration
of the thermistor test
module, and should be removed when conducting experiments. The air supply
nozzle module
may be connected directly to the heater adapter section.
b. Insert the red and black plugs of the thermocouple probe into
their respective jacks on the control
panel (jacks marked air temperature).
c. Connect heater module cable to heater supply receptacle on control panel.
d. Connect jumper cables from thermistor circuit diagram on control
panel to corresponding jacks on
control panel to corresponding jacks on control panel, (power supply to
power supply, multi-meter
etc.) in accordance with circuit diagram.
e. Plug into 110 VAC 60 Hz supply.
THE UNIT IS NOW READY TO OPERATE.
NOTE: The heater module will not operate until a minimum of 5 psi air is supplied across the heater element. This insures against heater element burn-out and also against damage to the thermistor test module due to over-heated air.
3. Thermistor calibration
A calibration curve of thermistor resistance versus temperature for the given disks will be provided. However, you are required to confirm the calibration for at least two points.
4. Measurement of Forced Convective Heat Transfer Coefficient
In performing the experiment, the Heater Section is not used (it must be removed) as it interferes with the velocity profile of the air flowing in the apparatus.
n. Record the voltage.
o. Record the dynamic pressure from the digital
manometer
p. If, however, the thermistor temperature exceeds the
safety limit before the voltages become
equal, the thermistor protection circuit will come into action, and
break the circuit, resetting
everything to zero. Hence, the voltage should be increased slowly.
q. Repeat Steps 4k – 4p for the remaining nine readings
for the test module.
r. After the ten readings are taken, close the
air pressure regulator valve.
s. Remove the test module, and replace it with the second
test module.
t. For the same pressure range, carry out Steps
4a – 4r for the second test module.


and d is the diameter of the disk.
4. Estimate the uncertainty of the experimental data and plot appropriate
uncertainty bands on the
above log-log plot.
5. Considering the functional relationship between the Nusselt # and Reynolds'# to be of the form:
6. What are the similarities and differences between the empirical correlation and the analytical(13)
Determine the constants "c" and "n". Also estimate the ranges of "c" and "n" within the
limits of the experimental uncertainty bands.
7. Due to the resistance-temperature characteristics of the thermistor,
it is very easy to overheat
the thermistor and destroy it. The thermistor overheat protective
circuit used in his experiment
guards the thermistor, against overheating, by switching off the system
when a certain
temperature is exceeded. Explain how it determines this temperature. Also,
is it possible to
adjust the this temperature? If yes, explain, how?

Experiment 5 Data Sheet
(Click here to Download Experiment 5 Data Sheet)
Forced Convection on a Flat Disk
Note: Please note the units of the quantities which are being measured, when recording data. For example, when measuring voltage, if the voltmeter reads 16 mV, then write down 16 mV instead of just 16.
I. Checking
temperature-resistance calibration for the thermistors:
| Unit | Dimensions | Temperature | Resistance | |
| Diameter | Thickness | 0C/0F | W | |
II. Determining
the influence of free stream velocity on heat transfer coefficient:
| Unit # : ___; Rs = ______W | Unit # : __; Rs = ______W | ||||
|
(F/C) |
|
|
Temp.
(F/C) |
D P (psi) | Voltage (V) |
YOU NEED TO GET THE LAB INSTRUCTOR'S SIGNATURE BEFORE LEAVING.
The student has
performed the experiment satisfactorily and has cleaned the work area.
___________________________ _______________
(Lab assistant's signature) Date